Halloween Witch Wreath

pastaHalloween is my second favorite holiday (Thanksgiving being my first, I love to eat.) I love to dress up,and love to decorate our house. I don’t go full on cobwebs on the porch, but I like a nice Halloween wreath and spooky pumpkin centerpiece or two.

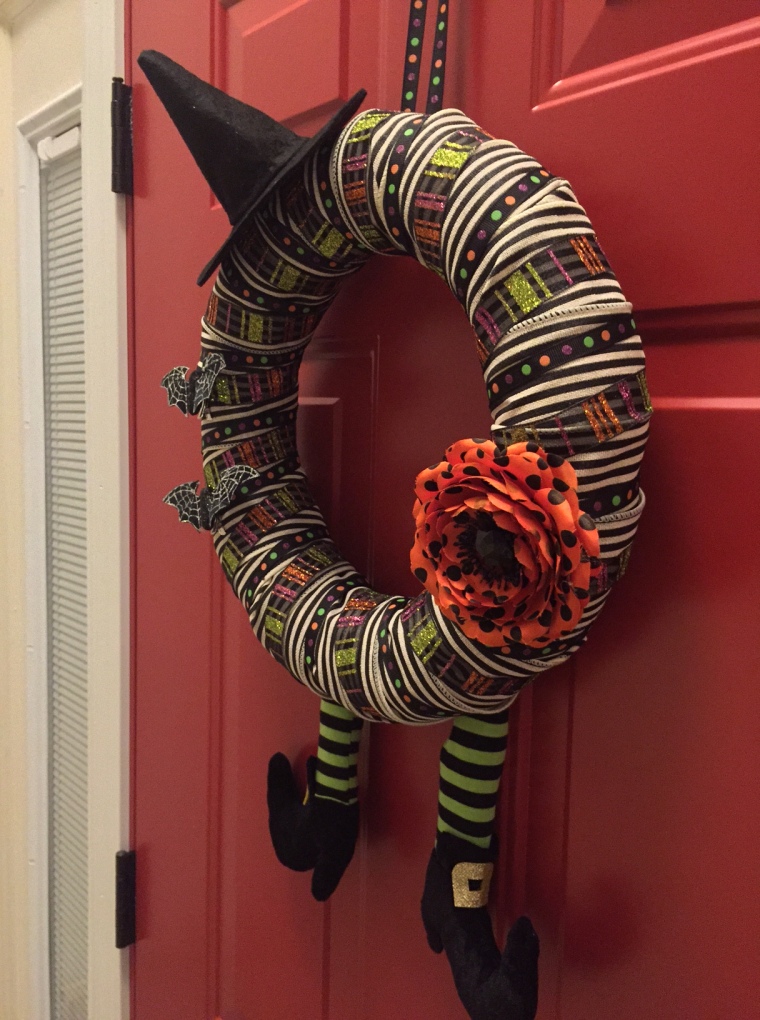
My Halloween wreaths the past few years have been pretty darn cute, if I do say so myself. So, I needed something equally as fun this year, for our first fall season in our new house. I came up with this super cute witch wreath, with glitter ribbon and fun colors.

I’m usually the hot glue gun’s #1 fan, but the way our house sits, my front door is directly in sunlight during most of the day. I’ve found that the sun gets so warm it actually melts the hot glue on my wreaths, causing decorative pieces to fall to their peril. So, this time around I used stick pins for attaching everything to a straw wreath. Worked like a charm, and I didn’t burn off any fingers, like usual!

What you need:
img_0372

  • 10″ straw wreath
  • Two spools wide ribbon for the base color (I used black and white striped)
  • 3 spools smaller decorative ribbon (with halloween prints, colors, glitter, etc.)
  • 1 pack stick pins
  • Witch’s hat (found at Hobby Lobby)
  • Witches leg decorative piece (also found at Hobby Lobby)
  • Decorative bat clips (found at Dollar Tree)
  • Decorative flower clip

What you do:

1. Attach one end of your wide ribbon to your wreath with 4 stick pins. **Do NOT remove the plastic wrapping from your straw wreath!!! I’ve done this before–horrible mistake. You’ll end up with a completely misshapen wreath, plus a floor that looks like it belongs in a barn.**

2. Wrap your ribbon all the way around the wreath, making sure the straw is completely covered. When you’re at the end of your spool, attach the tail to the wreath form.

img_03743. Repeat with second spool of ribbon until wreath is completely wrapped.

4. Repeat these steps with your smaller decorative ribbons.

img_0377

5. Attach your witch legs to the bottom backside of your wreath using stick pins. I cut the legs off of a decorative piece I got at Hobby Lobby for $4. They also sold witches legs by themselves (but I didn’t think they were as cute.)

img_0378

6. Attach your witch’s hat to the top left corner of your wreath, at an angle, closer to the front of the wreath form, using stick pins.

img_0379

7. Clip decorative bats (or other decorative pieces) to the slots in between the wide ribbon wraps on the left side of your wreath.

img_0381

8. Do the same with your flower clip, but attaching on opposite side from bats.

img_0382

9. Using any leftover ribbon, attach a small loop to the top back portion of your wreath with stick pins to use to hang.

img_0380

Happy Halloween!!!!

img_0408

img_0393

Loop Ribbon Wreath Second Attempt

This weekend I tried my second attempt at a loop ribbon wreath. My little city of Winchester, VA has a huge festival holiday in May called Apple Blossom which is all about pink and green. So this is in celebration of Apple Blossom! Again, was super easy, just a bit time consuming.

Apple Blossom loop ribbon wreath

Have you tried yet to make a ribbon wreath?

Loop Ribbon Wreath

sp12I have been making wreaths for quite some time, usually with ribbon, in a wrapped technique. I love the way the bright colors look in the sunlight against my blue front door. And Hobby Lobby has such cute prints, it’s hard to resist!

I have been wanting to take my wreaths a step further and try a loop ribbon technique but was actually pretty intimidating. I found many tutorials on Pinterest, and it just seemed like so much work. But, needing to make a new wreath for St. Patrick’s Day, I decided to take the ribbon plunge. I was pleasantly surprised at how easy this was and how great it turned out! 


What you need:
sp1

Round foam wreath (I used 12″)
Lots of ribbon spools! I used 8 in a variety of patterns and sizes. (Make sure one is a solid thick width to use as your base wrapping.)
Pack of stick pins
Scissors
Any desired embellishments or decorations

What to do:

First of all, you need to wrap your wreath foam with a wide solid color ribbon. Attach eat end with a stick pin. I did not have quite enough, so you can see some of the white showing through.
sp3

Next comes the most tedious part. Cut your ribbon into strips between 4-5″ each. You will want at least 20 strips of each ribbon, but I suggest going ahead and cutting the entire spool. If you want a more staggered look, you can cut different lengths. For this one I kept them all the same.
sp4

Once your ribbons are cut, congrats! You have passed the hardest part! Now you will start making your loops. Bend the ribbon and secure with a stick pin or two for wider ribbon.
sp6sp5

Poke the pins into the wreath to secure your loops. I used up all of one pattern at a time. I began with the thickest ribbon and tried to space them out evenly on the front and sides of the wreath. Don’t worry about which direction they face, it has a better effect if all are different.
sp7sp8

Continue until you are out of ribbon! Try progressing from thickest to thinnest. This seems daunting at first and a bit overwhelming, but as your wreath fills up more and more you will easily start to see the wholes where you need to fill in.

sp9

I added a shamrock centerpiece and some top ribbon to hang my wreath.

sp10

I was so happy with how this turned out! It is easily my favorite wreath so far. The entire project took me approximately two hours, and things were a breeze after the cutting. What I like best about this wreath is that nothing has to be perfect. In the end, the loops will all fit together and look great!

sp11

Have you ever tried to make a loop ribbon wreath?

Valentine’s Day Ribbon Wreath Tutorial

I am addicted to making wreaths. I try to make one for every new holiday or occasion. We took our Christmas decorations down this past weekend so it was time for the Santa wreath to go back in the closet. Next up was a Valentine’s Day wreath.

Valentine's Day ribbon wreath.
Valentine’s Day ribbon wreath.


I had all of these cute ideas to do a red chevron burlap wreath or a heart shaped wreath (using a heart shaped form) but these dreams were crushed when I realized it was Sunday and Hobby Lobby was closed so I had to go to Michael’s instead. I must say I was very disappointed in their selection compared to HL. They had no burlap ribbon at all, and definitely no heart shaped wreaths. No Valentine’s themed ribbon without wire either, which is what I normally use for these types of projects. But I made do with what they had and came up with this cute little thing! So here is a tutorial for how to make the easiest wreath you’ll ever try–a wrapped ribbon wreath!

What you need:
wreath1

For the wreath:
-Foam wreath form (I used 14″ diameter.)
-2 spools thick ribbon, approximately 2″ wide (MUCH easier to use ribbon WITHOUT wire.)
-1 spool thinner accent ribbon, approximately 1″ wide
-Scissors
-Hot glue gun
For the decorations:
-2 wooden hearts
-2 flower clips

What to do:

1. On the inside of your wreath form, glue the starting edge of your ribbon. I typically try to glue it at a slight angle, in the direction toward which you are going to wrap.
wreath3

2. Begin wrapping around your form. Try to overlap the ribbon slightly so that none of the foam shows through. Pull as tightly as possible to avoid wrinkles in your ribbon. Note: it is much more difficult to smooth out wrinkles with ribbons that have wire, hence why I typically use wireless ribbon.
wreath4

3. Continue wrapping until you run out of ribbon. Usually a full spool will cover 1/2 a 14″ wreath form. Then, glue the ending edge of ribbon to the inside of your form.
wreath5

4. Repeat from beginning step until your wreath is completed covered. Be sure to start your new spool of ribbon at the same place where the old left off.

Fully wrapped ribbon wreath.

5. Next it is time to add your accessories. I normally play around with the placement before gluing, to see what looks best. Use the hot glue gun to secure the wooden hearts to the upper left corner of your wreath.
wreath13

6. If your flowers do not have a clip, glue to the bottom right corner. If they have clips like the ones I used, simply pull the ribbon slightly away from the form and clip the flowers to the ribbon.

Flower with clip.
Flower with clip.

wreath12

7. Cut two long sections of your smaller accent ribbon. The length is up to you. This is how you will hang your wreath. Tie in a bow with some slack above your wreath.
wreath14

Here is the finished product! So easy and cute!

wreath6wreath8wreath9

Have you ever tried making a ribbon wreath?

Love Your State Frame

For Christmas I wanted to give my best friend something homemade since I have gotten so into crafting over the past year. She is from my hometown of Winchester but is currently living in the Hampton Roads area. I decided to go with this theme and put a little twist on the many framed state crafts I have been seeing on Etsy and Pinterest. Forgive me for failing to have pictures of the process but this one is not too difficult to follow.

Home State Picture Frame

What you need:
Scrapbook paper
-1 large piece for your background
-1 medium sized piece for your state
-Small pieces for your items
Double sided tape or glue
Scissors or razor blade
Pencil
Picture frame

What to do:
The hardest part was to cut out the state. For this, I figured there was no way I could freehand Virginia, so I needed to trace. I pulled up a picture of Virginia on my iPad, turned the brightness up as far as it would go, put the scrapbook paper overtop and started tracing. This worked out pretty well, but you have to be careful that you don’t move the picture around on the screen while tracing.

Next, cut out the state with scissors, or, better yet, a razor blade. Colorado and Wyoming–you lucked out on this part. Maryland and Massachusetts–not so much.

I then decided on three symbols–a house for where she lives, a graduation cap for where she went to college, and a heart for where she grew up (home is where the heart is, right?) You can trace or free-hand these, whatever is easiest for you.

Now simply tape or glue your state onto your scrapbook paper background and glue your symbols on the geographically correct locations (ashamed that I had to double and triple check this part!)

Where you live, where you went to school, and where you grew up.

Cut your scrapbooking paper to the appropriate size and insert into your picture frame.

My friend loved it! She sent me this picture of it hanging on her wall at home.
VA

What an easy and inexpensive gift for a friend, relative, or even as a housewarming present. What are some fun personalized crafts you have made?


Christmas Decorating When You’re Young and Cheap

Living on your own gives you a whole new perspective on holiday decorating. Growing up my mom had boxes and boxes of Christmas decorations–everything form tree ornaments to nativity scenes, those light up houses and candles for each window. She’d spend hours fixing up the house just right and making sure every strand of pearls was placed perfectly on the tree and the end result was always beautiful. First of all, ain’t nobody got time for that, and second and most importantly, ain’t nobody got money for that! Granted, she had several decades worth of collecting to build up her arsenal of holiday knick knacks, while I’m just starting out.

This being our third year in our townhouse, you’d think we’d have plenty of decorations all ready to go–negative. We tend to be non-committal to year after year styles (and also I have a tendency to throw things away when I have no place to put them…) so this year we found ourselves digging out what few items we still had, and hitting the stores for some more. The first thing I noticed when shopping is how God awfully expensive Christmas decorations are! Really, you want $49.99 for that gold bedazzled tree skirt? No thank you, I’ll settle for the red felt one at Dollar Tree. Heidi will likely pee on it anyway.

Heidi is not amused with Christmas. Scrooge.

So we settled for some garland, red velour bows, on sale red green and gold ornaments, and several stockings that made it through from last year. I do have some personal tree ornaments I collected growing up, mostly ballet and Nutcracker ones. Oh, and a lovely panda bear holding a pencil that says “extra sharp daughter.” Whose favorite animal wasn’t a panda bear in second grade?

World's Sharpest Daughter!
World’s Sharpest Daughter!
Dollar Tree stockings and Christmas Tree complete with $1 felt skirt!

But of course, my wreaths were my major DIY moments of the Christmas décor. I made a Santa Claus (courtesy of www.babyrabies.com) which I have to say turned out pretty adorable. Even my retiree male neighbor asked me if I made it and complimented it as “really cute!” I used a foam form and tied strips of white tulle in a square knot for the beard and on a piece of wire tied across for the mustache. Dollar Tree Santa Hat and buckle bow made the finishing touches on this cutie!

Mine vs. Pinterest
Mine vs. Pinterest

I also made a mini ribbon wreath for the inside of the door. I used a 10″ foam form instead of my usual 14″ and wrapped some red and white chevron ribbon all the way around. Two green glitter wrapper bows accented the top corner, both on sale at Hobby Lobby.

Chevron Christmas wreath

Our house may not be the most extravagant on the block (well actually, considering our neighborhood, it very well might be) or the Christmas home of my childhood, but it is festive and homey and was put together with love, which is more than enough for us this year!

What type of Christmas decorations have you thrown together on a budget?