
I am addicted to making wreaths. I try to make one for every new holiday or occasion. We took our Christmas decorations down this past weekend so it was time for the Santa wreath to go back in the closet. Next up was a Valentine’s Day wreath.

I had all of these cute ideas to do a red chevron burlap wreath or a heart shaped wreath (using a heart shaped form) but these dreams were crushed when I realized it was Sunday and Hobby Lobby was closed so I had to go to Michael’s instead. I must say I was very disappointed in their selection compared to HL. They had no burlap ribbon at all, and definitely no heart shaped wreaths. No Valentine’s themed ribbon without wire either, which is what I normally use for these types of projects. But I made do with what they had and came up with this cute little thing! So here is a tutorial for how to make the easiest wreath you’ll ever try–a wrapped ribbon wreath!
What you need:

For the wreath:
-Foam wreath form (I used 14″ diameter.)
-2 spools thick ribbon, approximately 2″ wide (MUCH easier to use ribbon WITHOUT wire.)
-1 spool thinner accent ribbon, approximately 1″ wide
-Scissors
-Hot glue gun
For the decorations:
-2 wooden hearts
-2 flower clips
What to do:
1. On the inside of your wreath form, glue the starting edge of your ribbon. I typically try to glue it at a slight angle, in the direction toward which you are going to wrap.

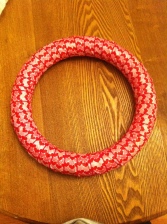
2. Begin wrapping around your form. Try to overlap the ribbon slightly so that none of the foam shows through. Pull as tightly as possible to avoid wrinkles in your ribbon. Note: it is much more difficult to smooth out wrinkles with ribbons that have wire, hence why I typically use wireless ribbon.

3. Continue wrapping until you run out of ribbon. Usually a full spool will cover 1/2 a 14″ wreath form. Then, glue the ending edge of ribbon to the inside of your form.

4. Repeat from beginning step until your wreath is completed covered. Be sure to start your new spool of ribbon at the same place where the old left off.
5. Next it is time to add your accessories. I normally play around with the placement before gluing, to see what looks best. Use the hot glue gun to secure the wooden hearts to the upper left corner of your wreath.

6. If your flowers do not have a clip, glue to the bottom right corner. If they have clips like the ones I used, simply pull the ribbon slightly away from the form and clip the flowers to the ribbon.


7. Cut two long sections of your smaller accent ribbon. The length is up to you. This is how you will hang your wreath. Tie in a bow with some slack above your wreath.

Here is the finished product! So easy and cute!


Have you ever tried making a ribbon wreath?


